WYSIWYG Editor Configurations
WYSIWYG Editor Configurations allow you to customize which features of the WYSIWYG rich-text editor are available to content creators.
Topics
Overview
WYSIWYG Editor Configurations allow you to customize which features of the WYSIWYG rich-text editor are available to content creators.
By default, Cascade CMS's System Default WYSIWYG Editor Configuration governs all WYSIWYGs that don't have a site-level editor configuration specified. For sites that need further WYSIWYG customization, one or more site-level WYSIWYG Editor Configurations can be created and applied either as the default for one or more sites, or to Content Types and/or Data Definitions for greater granularity.
↑Editor Configuration Settings
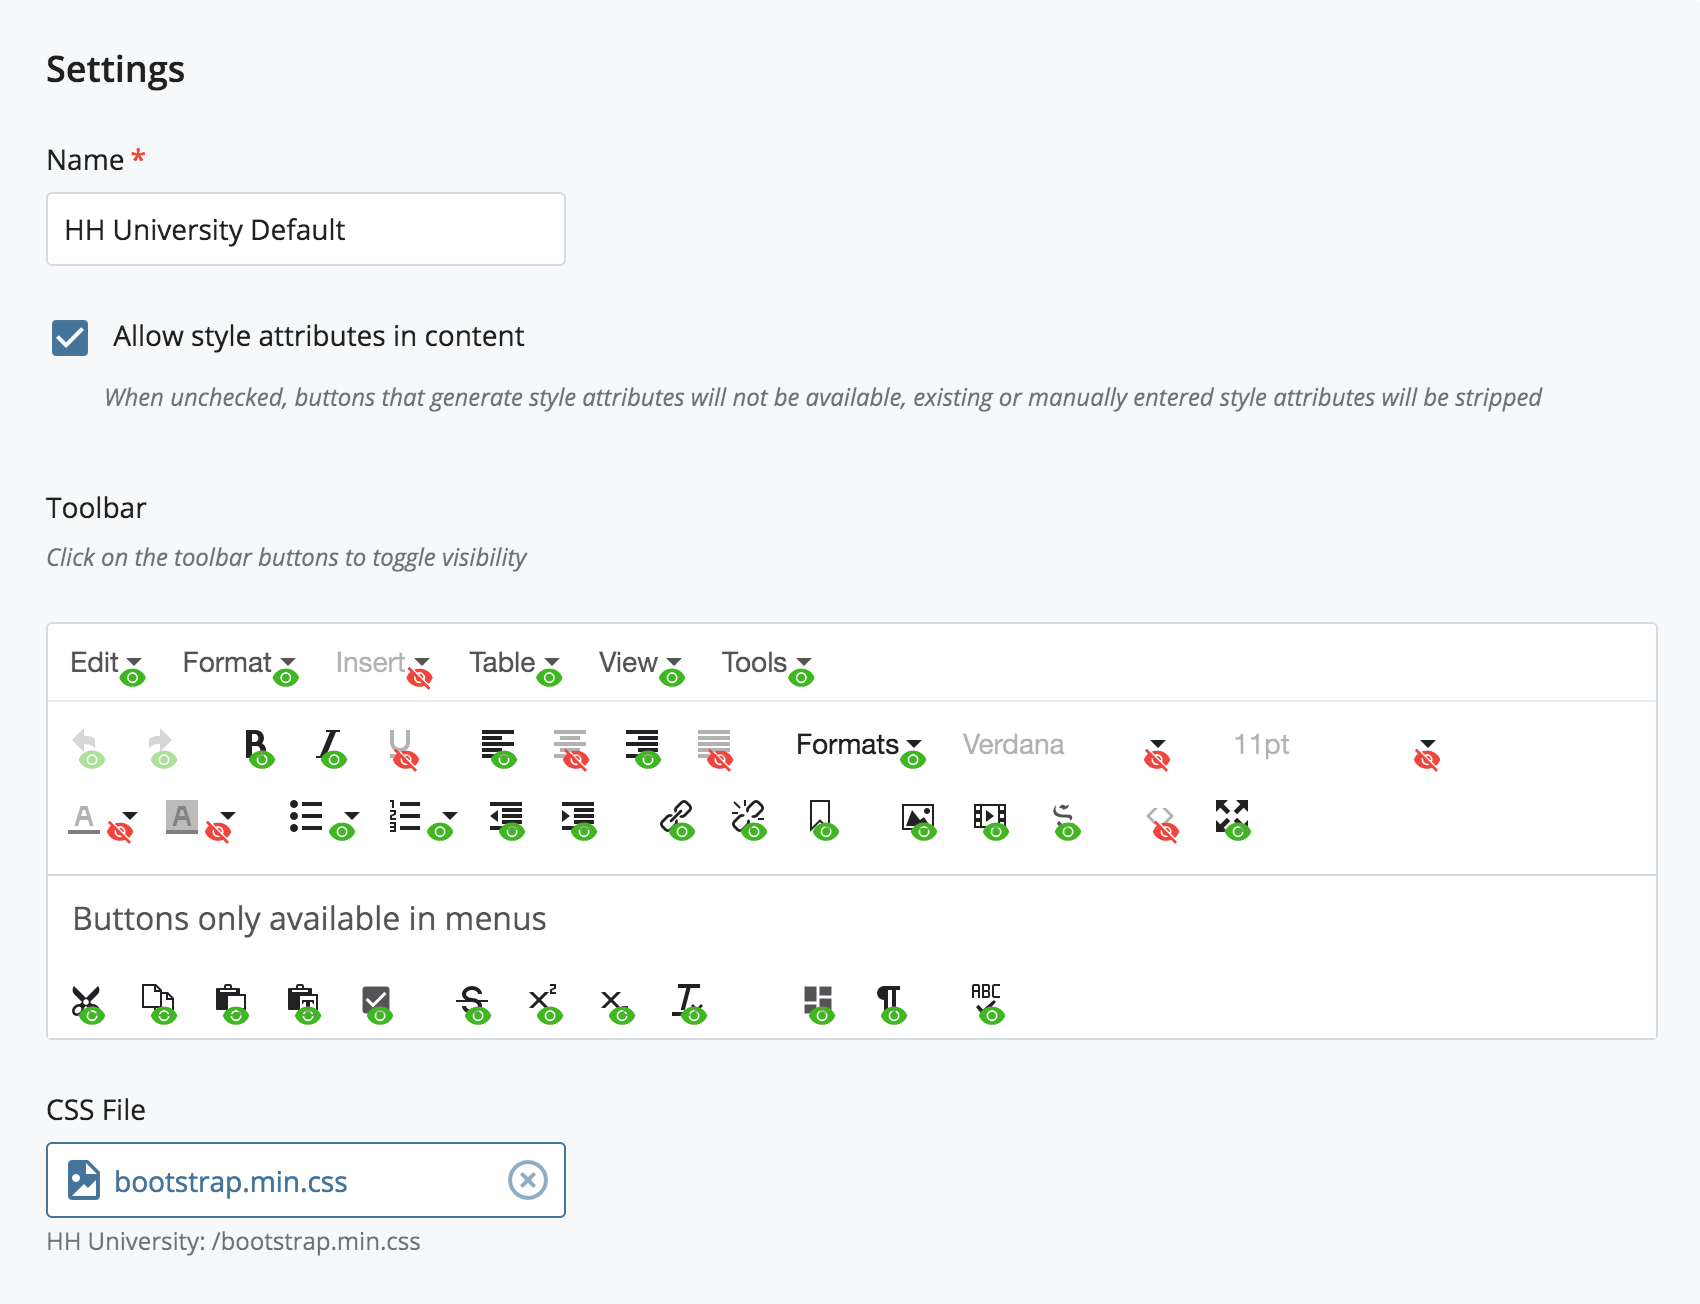
- Allow style attributes in content - When this option is disabled, buttons that generate inline style attributes will be disabled and hidden.
- Existing style attributes or style attributes manually entered in the source code of the WYSIWYG will be stripped.
- An exception is made for Data Definition WYSIWYG fields that have deprecated options enabled to preserve old functionality from previous versions of Cascade CMS. Style attributes are removed, but all buttons will be visible.
- Toolbar - Click on the toolbar button icons to toggle their visibility in the WYSIWYG.
- Disabling a button within the toolbar will remove any corresponding menu items that may be present; however, disabling a menu will not remove corresponding toolbar buttons.
- CSS File - Choose a CSS file to apply to the WYSIWYG to allow users to preview the site's styling within the WYSIWYG.
- Schema - Choose a schema to control which HTML elements are permitted in the WYSIWYG.
- All - Allows any tag.
- HTML5 - Allows any HTML5-supported tags excluding those entered in the optional Invalid Elements field. Elements specified in the Invalid Elements field will be stripped from the WYSIWYG.
- Custom - Allows only tags provided in the Valid Elements field, all other elements will be stripped from the WYSIWYG.
Editor Configuration Custom Formatting
- Visible Built-in Formats - All default formats such as headings will be appear here. Remove items from this field to hide them from the Formats menu.
- Formatting Type - In addition to the built-in format options, you can make custom formats available to users using the Simple or Advanced formatting options:
- None - No custom formats provided.
- Simple - Provide a comma-separated list of CSS classes in the CSS Classes field to make available in the custom formats menu. These styles will be applied to the selected content's
styleattribute. - Advanced - For greater control you can build custom formats, with the option to scope them to appropriate content, with the following settings:
- Format Title - A descriptive label of your custom format that will appear in the custom formats drop-down menu. For example: "Bold Red Text" or "Blue Button".
- Apply format to specific CSS3 selector(s) only - Enabling this option ensures that your custom format can only be applied to elements specified in the Applicable CSS3 selectors field. For example: If a format should only apply to images, enable this option and specify
imgas the applicable selector.- Formats that apply to
imgandaelements will be made available in the Insert/edit image and Insert/edit link menus, respectively.
- Formats that apply to
- Tag name of the element to use as a wrapper for the current selection - Wraps selected content with the specified tag. If the tag is a block element, existing block elements surrounding the selection will be replaced with this element. For example: Select
spanto wrap your selection with a span tag in order to style inline content. - CSS classes to add - A comma-separated list of CSS classes to be applied to the selected content's
classattribute. - CSS styles to add - A semicolon-separated list of CSS styles to be applied to the select content's
styleattribute.
Editing the System Default WYSIWYG Editor Configuration
To edit the System Default WYSIWYG Editor Configuration:
- Navigate to Administration > System Default WYSIWYG Editor Configuration and click Edit.
- When finished configuring the editor settings, click Submit to save your changes.
Creating Site-Level WYSIWYG Editor Configurations
To create a site-level WYSIWYG Editor Configuration:
- Navigate to Manage Site > WYSIWYG Editor Configurations.
- Click Create.
- In the Name field, enter a name for your configuration.
- When finished configuring editor settings, click Submit to save your changes.
Applying WYSIWYG Editor Configurations
Site-level editor configurations can be applied at various levels to fully customize the content-editing experience for users.
At the Site Level
Editor configurations specified as site's default will be used for:
- WYSIWYG fields in Data Definitions.
- Pages using a Content Type without a Data Definition selected (WYSIWYG-only).
- XHTML Blocks without a Data Definition selected.
To specify an editor configuration as the site's default:
- Navigate to Manage Site > Site Settings.
- In the Properties tab, select a site-level configuration in the Default WYSIWYG Editor Configuration field.
- Click Submit to save your changes.
For cases where more granularity is required, editor configurations can also be assigned at the Content Type and/or Data Definition field level (see below).
At the Content Type Level
For Content Types that do not have a Data Definition selected, an editor configuration may be chosen to override the system or site default editor configuration. This editor configuration will used for pages using a Content Type without a Data Definition selected (WSYIWYG-only).
To apply an editor configuration to a Content Type:
- Navigate to Manage Site > Content Types, select the appropriate Content Type and click Edit.
- Under WYSIWYG Editor Configuration, select the appropriate site-level editor configuration.
- Click Submit to save your changes.
At the Data Definition Level
Editor configurations can be specified for individual WYSIWYG fields in a Data Definition to further customize the content users can create for that field. For example, a “simple” configuration with only basic formatting buttons may be used for summary and caption fields that only require basic text and some markup.
To apply an editor configuration to a Data Definition field:
- Navigate to Manage Site > Data Definitions, select the appropriate Data Definition and click Edit.
- Click the edit button ( ) next to the appropriate WYSIWYG field and then click Show Advanced Settings.
- Under Editor Configuration, select the appropriate site-level editor configuration.
- Click Submit to save your changes.